Saturday, August 22, 2015

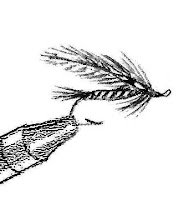
Attaching Fly Tying Thread and Materials

How to properly attach the thread and materials.
To ensure that materials will not slip and come apart, it’s important to tie them in neatly and tightly to the hook shank. Hold materials between your thumb and forefinger and place the material on top of the hook. Then, pinch the thread and material and make numerous neat, firm wraps over the material to secure it. Loose wraps will cause the material to slip and pull out. Too many wraps will bulk up the shank making it difficult to attach other materials. 

Bulky materials such as large tinsels, lead wire, stems of feather quills and raffia will usually require a heavier thread like D thread, 2/0 Monocord, Kelvar and Nymo. Also, the ends of the heavier materials may have to be tapered so they can be smoothly attached.  For most materials, lighter threads are easily attached and tapering is not needed. 

Illustrations of attaching thread and materials.


Wednesday, August 19, 2015

A Thief in the Night

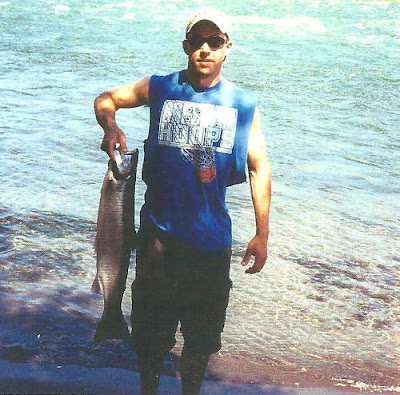
Young man standing on a bank of a river holding up a 12-;pound steelhead he just landed
David holding up meal for a raccoon?.
The Deschutes River was in good shape and very productive. Everyone in our party had action, but most of the Steelhead were released since they were wild. My son David, however, had caught one nice 12-pound hatchery fish that we planned to have for dinner the next day. After the fish was cleaned, he hung it high on an alder branch to allow the evening air to set up the meat. 

It had been a very successful day. Our spirits were high and the camaraderie was enjoyable, but the long day had sapped our energy. After numerous jokes and stories, we headed for out tents. Suddenly, I noticed that David's fish was still hanging in the tree. Knowing that numerous varmints caroused around at night, I suggested that he take it down and put it in the cooler. However, he and his buddy decided to stay up a little longer to discuss the day's success and plan out tomorrow's strategies. 

The next morning, as everyone was preparing for the morning fishing, David suddenly blurted out, "All right, which one of you guys took my fish?" Everyone just shrugged their shoulders. David started walking around looking for any sign of his fish, and I walked toward the branch where the fish had been tied and called out, "David, guess what? You just got ripped off by a thief in the night!" He asked what I meant and I responded, "Raccoons! They gnawed off the rope." We later found out that there were 13 intruders rummaging around out camp that night--a mamma raccoon and her 12 cubs. It was a good lesson, and for the rest of the trip everything was tightly secured.   

Friday, August 14, 2015

Story Behind the Dark Max Canyon Steelhead Fly and How to Tie It.

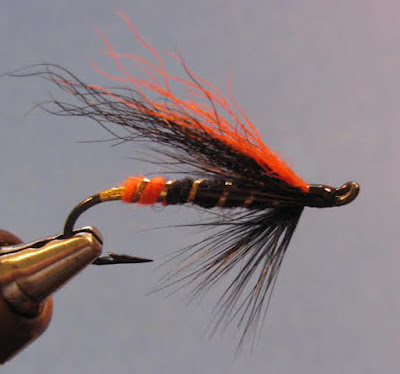
A closeup picture of the Dark Max Canyon steelhead fly in the jaws of a fly tying vice
Dark Max Canyon Steelhead Fly
The Dark Max Canyon fly had its origin on the Deschutes River because of a chance meeting with an angler who wasn’t catching any Steelhead. I was fishing the west side of the river and having good success. In less than two hours I had landed and released five Steelhead. During that time the angler on the east side wasn’t having any luck, but I could tell that he was a good fly caster and was covering the water very well. When the sun finally danced across the water, I called it quits and rowed back to the other side. 

Interestingly, the lone angler who had been fishing on the other side was waiting for me. His name was Larry Piatt, and after cordial introductions he asked me one, simple question, “What the heck are you doing to hook those fish? I’ve been fishing this river for over a month and haven’t had a strike.” I looked at his outfit, his leader and fly and said, “Larry, you’ve got the right gear and I watched you fishing over there and your technique is fine. Just keep on doing what you’re been doing!” 

For the balance of the summer we began to fish together. He finally started to catch some fish but it wasn't because of what I said. It was because of what I forgot to say which was that sometimes in Steelhead fishing you just have to get lucky. However, my original and seemingly harmless comment haunted him. When we would be talking with other anglers he would say, ”Here I was, watching this guy hook and release five Steelhead in a row, and when I asked for some solid advice, all he said was, “Keep on doing what you're doing.” I figured that meant, keep on getting skunked! 

Sometime later, Larry tied a variation of the Max Canyon fly called the Dark Max Canyon. It’s a darker fly, has a lower profile and is effective in all water types. Here’s the recipe. 

Hook:  Mustad 36890, sizes 4-6.
Thread:  3/0 Black Monocord.
Tip:  Flat gold Mylar tinsel.
Rib:  Medium gold oval tinsel.
Body:  1/3 orange & 2/3 black wool or yarn.
Hackle:  Black Saddle.
Wing:  2/3 black calftail with 1/3 orange calftail on top.


Step 1
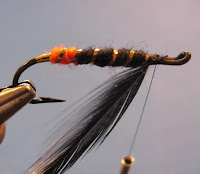
Tie in flat gold tinsel at the hook bend and wrap 1/8 inch forward 
above the hook barb. Attach the tinsel and orange yarn.


Step 2
Wrap the yarn up 1/3 inch and attach the black yarn.


Step 3
Wrap the black yarn up 2/3 of the shank, 
spin 5 or 6 turns of gold oval tinsel forward 
and tie off. Attach the black saddle hackle.


Step 4
Wrap the black hackle forward and tie it back to a 45-degree angle

Step 5
Cut a clump of black calftail for the underwing and a smaller amount of orange calftail for the overwing and tie in the wing. Secure them tightly and complete the head.

Saturday, August 1, 2015

How to Tie the Zug Bug.

picture of the Zug Bug fly in the jaws of a vice.
Zug Bug
This buggy looking pattern was developed by Chris Zug in Pennsylvania in the 1930’s. It can imitate mayflies, dragon flies and caddis pupae or larva. Dead drifting and/or twitching the fly close to the bottom produces the best results. In deeper or faster water, you may have to weight the body with lead wire or use split shot. It’s a good all-purpose searching pattern as well. 


Materials for tying the Zug Bug: 


Hook:  94840 Mustad, sizes 10-16
Thread:  2/0 black Monocord
Tail:  Peacock sword tails
Body:  3-4 Peacock herls
Rib:  Small to medium silver oval tinsel
Hackle:  Soft Coachman brown


Step 1. Tie in the peacock sword tail and tinsel and then 
wrap the peacock herls forward to within 1/8 inch of the eye. 


Step 2. Wrap the tinsel forward 4 or 5 times and tie off.  


Step 3. Tie in the duck flank feather so that it 
lies flat over the back and tie in the hackle. 


Step 4. Wrap the hackle forward 2 to 3 times and tie it off so that it flows back 
over the body at a 45 degree angle. Cement the head and the fly is competed.  


Friday, July 24, 2015

Fly Fishing and Tying Pale Morning and Pale Evening Duns


PMD and PED tied by Doug Stewart 

Pale Morning Dun 

The Pale Morning Dun is a dry fly in the order Ephemerella. It is found only in North America from the Rockies to the Pacific Ocean. It has three tails and is available during daylight hours, which makes it much easier to see. It is slightly larger than its counterpart the Pale Evening Dun and is more commonly used. Its hatch cycle is from June to August. 


Pale Evening Dun 

The Pale Evening Dun is a dry fly in the order Heptagenia and inhabits the same region as the Pale Morning Dun. It has only two tails. It usually emerges in the late afternoon to evening, and mating and laying eggs on the water (ovipositing) occurs sometime later. It hatches out from April to October. 


How to Fish the PMDs and PEDs

When it is too dark to follow the Dun, let it become awash as it glides across the surface. This will allow it to simulate a wet fly being fished down and across the current. This method is commonly called the wet fly swing and can create strong and aggressive takes, especially late in the evening. When fish are not surface feeding, you can also use a watery dun flymph pattern to interest trout. 


Bowing to the Fish

One caution is offered to ensure solid hookups. You must keep your rod pointed at a low angle to the water as the fly swings and when a fish strikes lean slightly forward as you set the hook. This is called "bowing to the fish."

Friday, July 17, 2015

Fly Fishing in Hot Weather with a Leadwing Coachman.

My Fat 16-Inch Trout
The Leadwing Coachman fly was originated in the early 1800s. It was tied by an Englishman who was a hired coachman, and to please his lord he tied this fly. I have used it for years and have always had consistent success with it by swinging it across the surface or dead drifting it. One of the better times to use it is during caddisfly hatches, especially when dry flies are nonproductive. 

I had the opportunity to fish the Deschutes River in early July when the caddisflies were particularly active. The only problem was that an extended heat wave was going on and the temperatures had been in the mid to high nineties for nearly a month. This can cause water temperatures to rise to 70 degrees or more. This condition can play havoc with trout fishing because warm water contains less oxygen than cold water. As temperatures rise the oxygen levels decrease and trout will begin to undergo extreme stress and become lethargic. The fact is that extended high temperatures can also cause death. Optimum temperatures for rainbow trout is around 40 to 61 degrees depending on the stream and location, so a stream thermometer can be a helpful tool. 


Eye-Catching Sunset on the Deschutes River
One evening I headed downriver to one of my favorite evening haunts, but I had serious concerns about my success.  As I approached, the air temperature was 99 degrees and the water temperature was almost 68 degrees. There was a decent hatch of caddisflies and a few Pale Evening Duns, but there was little evidence of rising fish. At any rate, I decided to make a few casts using my Leadwing Coachman. After a hour of periodic casting, I managed to hook and release a tired-looking 7-inch trout. Regretfully, the only thing that was really biting were the mosquitoes, so I took a few photos of a sunset and left. 

The second evening wasn’t quite as hot and the water temperature had dropped to 63 degrees. The changes were minimal, but it made a substantial difference. I hooked three fish and landed two:  a 10 incher and a fat 16 incher. I also watched a fish close to 20 inches jump and spit out my Leadwing Coachman. I had a warm feeling of satisfaction. 


Saturday, July 4, 2015

Don't "Bogart" Fly Fishing Water

Deschutes River Canyon in Oregon's high desert plateau
Classic Deschutes River Steelhead Run
My friend Don Wilson and I were fishing a popular Steelhead hole on the Deschutes River in Oregon. We were casting and working our way down to a tailout when two anglers wearing baseball hats rudely waded into the river not more than 20 yards below us. In a demanding voice I told them that it wasn’t proper to cut in that close to other anglers, but they scoffed at us and began to cast. Don didn’t want a confrontation, but I told him that they were trying to “bogart” the hole and have probably done it to others. To avoid a nasty confrontation, some anglers will concede their water, but I believe that inconsiderate acts like this should be quickly dealt with.

As a guide, I wasn’t easily bluffed; so rather than argue with them, I walked slowly in their direction while making numerous casts toward them. They quickly took notice. Rather than take the chance of getting snagged with a No. 4, 9049 Mustad hook, they begrudgingly began to move backwards while retrieving their lines and bleating some derogatory expletives. Don was somewhat surprised by my aggressive behavior, but I explained that there’s a proper way to approach other anglers when you want to fish near them and it requires just a simple rule.

Be polite when approaching other anglers and simply ask if you can fish behind or below them at a reasonable distance. Sadly, there are a few fly fishers that want to monopolize the water. However, a vast majority will not only say yes, but even invite you to fish with them. In many cases, courteous actions can lead to the building long lasting friendships.

Thursday, July 2, 2015

Tips for Keeping Your Fly Tying Area Organized

Fly tying thread displayed on racks, four levels high and 5 to 7 spools wide
Doug's Thread Rack
A messy fly tying desk can interfere with the orderly function of tying flies. Portable fly tying benches can somewhat organize your equipment and materials by providing places for keeping scissors, bobbins, threads and other important tools close at hand. However, threads can create another problem. They can get tossed around in boxes and other containers, and only a few colors can be comfortably displayed on a fly tying bench. Also, sorting through the colors to find the right one is time consuming. So what do you do? 

A good solution for organizing your threads is to purchase a thread rack from a sewing center, or you can make your own by cutting wooden dowels into 1 to 1 1/2 inch sections and gluing them onto a board. Place the rack near your tying area for quick and easy access. 

Saturday, June 27, 2015

How to Tie Fan Wing Flies

Brown Hackle Peacock dry fly with fan wings of mallard breast feathers, red hackle tail, peacock body and brown saddle hackle
Brown Hackle Peacock 
Fan wing flies were most popular from the early 1920’s to the early 1950’s. To many, fan wing patterns were very classy and effective but harder to tie than other flies. They were primarily used to represent a large mayfly, but the wing style did not closely resemble a mayfly since they were lop-eared instead of the customary upright position. In spite of this deviation, they still fished very well. 

 The wings come from the breast and flank feathers of mallards, wood ducks and other types of ducks and birds. Fan wings are not the easiest to tie, are very fragile and seldom last after hooking numerous fish. Another problem can develop when casting the fly. The wings will often twist and turn in the air as well as float off balance on the water. This is due to their cupped wing feathers. 

The fan wing fly shown below is called a Brown Hackle Peacock. Here are the tying instructions. To make a base for the feather stems and to help hold them in place, wrap several X-winds around the hook. Place the wings together fanning outward and pinch the quill ends with your fingers so that they straddle the hook. Set them in place with 5 or 6 tight overwraps. Next, wrap 3-4 turns of thread around the base of the quill ends and tighten them to the hook. Check for the alignment and reposition them if necessary. Then, make several more turns of thread abound the base and trim of the ends. Cement the windings and finish the fly.

Friday, June 26, 2015

How to Tie Dry Flies that Float Higher and Drier

head tail, peacock body, grey hackle dry fly
"Heavily-Hackled" Grey Hackle Peacock Fly
Fishing the rugged waters of many western rivers and streams can play havoc with many of the more delicate feather wing flies. Constantly using fly floatants and refurbishing the hackles to help your pattern float can take away time from your fishing, so here’s is a solution. Use a heavily-hackled pattern. This will create a fly that has higher buoyancy and stronger endurance to withstand the wear and tear on delicate dry flies. Here is the method to tie a Grey Hackle Peacock.  

Step 1. Begin by tying in red tail fibers and a peacock herl body 2/3 up the shank and tie it off. Then tie in a long Grizzly saddle hackle and wrap it forward to the hook eye and tie off.  

how to tie a heavily-hackled dry fly
Step 1. Tying the Heavily-Hackled" Grey Hackle Peacock
Step 2. Wrap the hackle back to the body and bring it forward again to the hook eye and tie it off. The result should show a large, bushy hackle.

How to wrap back through a dry fly wing to create a heavier hackle.
Step 2. Tying the Heavily-Hackled" Grey Hackle Peacock
Step 3. Trim off the excess hackle and finish the head.

Saturday, June 20, 2015

Cooking Trout in a Cast Iron Skillet

Man kneeling and holding 2 large trout with 7 more in a row on the grass in front of him, on the bank of a wooded Canadian lake in background.
Chuck Stewart showing our catch of Kamloops trout!
After almost 480 miles we finally reached Huff Lake, B.C. As was the custom back in the early 1960s, we always stopped by Wilson Ranch to get a fresh fishing report. The lake was in good shape so we headed up the rough, dirt road and set up a camp. The Kamloops rainbows had put on a few more pound this season. The fish were in the 5 to 6 pound range with some measuring well over 20 inches. We quickly rigged our rods up and, as in the past, fish began to take my Huff Lake Shrimp pattern aggressively. Inside of two hours we hooked and released a dozen fish or more. We decided to keep a few fish for dinner that evening, and we began to prepare for a late meal.

Back in those years, my cooking utensils were not the state of the art. Everything was fairly clean with the exception of my 14 inch cast iron skillet. It was in absolute disarray. Not only was it dirty, but it was rusty and still had greasy remnants from a previous trip. My dad was stunned and said that it wasn’t fit to eat from. Rob admittedly wasn’t a great cook, but he knew that cast iron had to be kept clean and in good condition. After an hour of completely refurbishing the neglected pan, we prepared a meal with fish as our main entrée. Our meal that evening was very tasty, but not just because of the clean cast iron skillet. It was also because of the fire engine red meat of the Kamloops trout. Their coloration was mainly due to the fish’s avid diet of fresh water shrimp, and to this day my mouth still waters when I think of their rich and savory taste.

Cast iron flying pans and Dutch ovens will last forever if you take care of them. To begin, it’s a good idea to buy American made cast iron to guarantee its quality and heating performance. Good cast iron retains heat evenly and can tolerate high temperatures without any damage. Also, it cooks even better the more you use it.

Methods for properly taking care of cast iron skillet.
1. Clean it with a little hot water. If food is stuck to the pan, use a wooden spoon to scrape it off.
2. Heat the pan to 200 degrees Fahrenheit and then let it cool.
3. Use a rag to reseal the entire pan with a light coating of olive oil and it’s ready for storing.
4. Warm up and cool down cast iron gradually to preserve its longevity.

Things not to do with cast iron skillet:
1. Do not boil water in cast iron because any seasoning will dissipate.
2. Do not place the pan over really high temperatures as this can eventually cause cracking.

Fire it up and enjoy some delicious pan of fried trout!


Thursday, June 18, 2015

Reconditioning and Storing Chenille

Plastic container with chenille stored inside and a tip of it coming out the top.
Easy to Store Chenille
In fly shops and other stores, wrapping chenille around cards is a convenient way to display it for resale. However, if it has been left on the shelf for a while, the chenille may become kinked at the folds and sometimes flattened or creased. This may also occur in shipping or when customers repeatedly handle it for inspection. It is often referred to as being shop worn. 

If the chenille is the exact size and color that you want, buy it because creases and flattened areas can be reconditioned by using steam. To do this, heat up a teakettle of water and move the material back and forth through the steam, lightly stroking it with your fingers. If it begins to twist a little, work the twists back towards the unsteamed end. This should get rid of the creases and fluff. 

Another problem is that carded chenille usually gets tossed around a lot in fly tying kits, and it can also show the constant wear and tear of handling it. My solution for this is to put the chenille inside a clear, plastic cylinder. Then, poke a hole in the top of it and pull a small end of chenille slightly through the hole. No muss, no fuss. Types, colors and sizes of the chenille can be listed on the outside of the cylinders. From then on, your chenille will always stay in prime condition and ready to use.

Saturday, June 13, 2015

Pros and Cons of Spey Rod Fly Fishing

Spey rod fly fisher in a large river, rocks in the foreground and green trees in the background
Photo By: John Shewey, Classic Steelhead Flies © 2015
Spey fishing is named after Scotland’s Spey River. It is basically a dramatic roll cast that helps to change the direction of the cast and enables casting longer distances. I learned how to cast a Spey rod over 30 years ago on the Sandy River with my friend Cal Cole. He had a good understanding of Spey casting and showed me the basic methods. However, I was having such good success with my single handed rod that I didn’t feel that there was a need to change.

The advantages of Spey casting are obvious for larger rivers in that long casts can be effectively used to cover more water. You can also use special casts such as the Snap C, T and Z, which are very important in putting the fly in motion. Spey casting may be less frustrating and fatiguing than casting a single-handed rod. It may also be more effective in mending the line, controlling its speed, and using less effort to play fish. Aside from this, a Spey cast is primarily a long roll cast that doesn’t require extended back casts. This allows you to cast and fish in places that are surrounded by obstructions such as trees and brush. Of course, this depends entirely on the ability of the caster.

There are some disadvantages in Spey casting. Longer rods may become more difficult to handle when you try to land a fish with your hand. If you are fishing a good run that has brush, logs and other debris behind and below your position, landing a fish can be difficult. I can remember an angler that had to stick his Spey rod back into brush and use the tip section to try and land his fish. Longer rods can be less efficient in fighting fish and may cause overkill on smaller fish. Also, transporting Spey rods in a car and carrying them through brush can be difficult.

An additional and somewhat unfortunate problem with Spey casters is that many never had the time or inclination to learn how to cast and enjoy a single handed fly rod. Casts like the side arm, back hand, curve, parachute and many others are seldom used in Spey casting. These types of casts are vital for success in fishing all types of waters. Also, anglers that first learned how to cast a single handed rod usually make a smooth transition when learning how to Spey cast. I also believe that if you are a sturdy wader and can cast 60-70 feet or more, you can cover nearly as much water as a Spey caster.  A final dilemma is that Spey rods weren’t made to fish small streams and rivers and personally, I like to fish small rivers.

One thing for sure, I’m not trying to discourage people who want to learn how to Spey cast. It’s a very productive and satisfying method to use. And maybe, just maybe, when my old legs start giving out I’ll become a dyed-in-the-wool Spey caster. I remember my Dad’s transition when he was in his late 70’s and not able to wade like he used to. He gave in to better judgment and switched to using a bubble and fly on his spinning rod and he caught fish. Aging has a natural tendency to change a lot of old, integrated habits, and Spey casting may be the logical answer.

Friday, June 12, 2015

Problamatic Lake Fly Fishing

Jim's 16 inch Trout
It was a clear, picturesque day as Jim’s Ford pickup bounced over the ruts and chuck holes that guarded the Central Oregon lake’s rocky entrance. The sky was a deep azure blue with a hint of a little wind and maybe some good luck in our quest for large rainbow trout. But as we bumped up the rocky grade to the lake’s dike, a problem quickly arose. 

Because of the mild winter, the lake’s shoreline was clogged with algae and reed beds that were wider and thicker than normal. Longer casts of 40-60 feet would be required to avoid snagging and to reach fishable water. As we rigged up our outfits, the bulrushes and tall grasses were being invaded by a variety of birds in search of food. We hoped that the fish would be in the same feeding mode. 

Thunderheads Building Up
A first cast hookup was usually a good sign that we might have a banner day. My first attempt gave us hope as I hooked a beauty, but I lost it after a short battle. Jim had a few takes as well but didn’t have any solid hookups. After two hours, we had nothing more than a few good strikes and short takes. As we sat down to eat our lunch, I noticed that a series of large thunderheads were building up in the Northeast. From past experiences, I knew that this could easily indicate a falling barometer and put fish off the bite. I hoped this wouldn’t happen. 

Released this nice trout.
After lunch a brief hatch of emergers surprisingly occurred. I hooked and lost a few trout and Jim finally landed a nice 16 incher and lost one over 20 inches. This gave us renewed hope, but without warning the wind began to pick up and gusts of 20-30 miles per hour whipped the water into heavy riffles. The hatch was quickly put down which further dampened our spirits. 

We decided to wait out the oncoming storm for another hour, but without observing any surface action, we finally called it a day. In some respects it was a disappointing trip, but rather than mope about it, we chalked it up to bad luck and the fickle whim of Mother Nature.  

Friday, June 5, 2015

How to Spin Deer Hair to Build Bodies and Heads


Step 1. To begin, cut a clump of hair say 1/4 inch thick and comb the fluff out of the hair and trim off the remaining tips. 


Step 2. Lay the clump on top of the hook and hold it with your fingers. Make 2 loose wraps and pull the thread tight and make 2 to 3 spins. 


Step 3. The hair should spin as you wrap. 


Step 4. Compress the deer hair together with your fingers and make a few tight wraps of thread in front of the hair. When the hair spinning is done, compress the front and back of the hair to make it a dense clump. Repeat the process for a longer body, and trim it to the desired shape with scissors or a razor blade .

Saturday, May 23, 2015

Fly Tying: Stacking Hair with and without a Stacker


Stacking hair is done to even up the tip ends to build bodies, heads, wings, legs and tails of flies. Commercial hair stackers are commonly used, but if you don't have one, your fingers can be used for the same purpose. There are many good stackers on the market. I prefer the Renzetti stacker because it has both a small and large cylinder. Both stacking methods are shown below. 


Commercial Stackers
Cut a clump of deer hair and use a fine-toothed comb to remove the underfur. Then place the hair, tips first, into the stacker and hold it slightly at an angle as you tamp them down. If you stack the hair vertically, the hairs might fall to the side unevenly and will have to be sorted out. To finish, hold the stacker horizontally and pull out the lined-up hair. 


Finger Stacking
If you don't have a commercial stacker, you can use your fingers to even up the hairs. To begin, tightly grab the longer tip ends of hair with your gingers and pull them out. Then, replace them in the stack so the tips are even with the original bunch. Repeat this process until the hairs are all even. 


Note:  A strong thread is necessary to avoid breakage as you spin the hair. A nylon thread, Kelvar and Nymo will prevent this from happening. Also, other stackers such as Brassie and Anvil are reliable choices.  

Saturday, May 16, 2015

Fly Fishing Coincidence on Deep Creek

Deep Creek, Oregon
Deep Creek is a small tributary of Oregon’s Clackamas River, and years ago it had runs of wild Steelhead and Coho salmon. Today much of it is on private property, and it is closed to fishing for anadromous fish such as salmon and Steelhead. However, years ago before these regulations were instated, two very similar events occurred on this stream to me and my close friend, Larry Lindstrom. His story took place when he was only 7 years old and my story occurred when I was 21 years old. 

My episode unfolded when I was visiting a friend who owned property near Deep Creek. The stream was low and shallow in most places, but there were small, 3-to-4-foot pools here and there that were overshadowed by Alder trees and underbrush. Using my 8-foot, 5-weight, glass Fenwick rod, I waded downstream, repeatedly casting into the pocket water using a small, orange yarn fly. I was hoping to catch a few Rainbow trout when suddenly a large splash erupted and a 6-pound Steelhead headed down river. My elation ended quickly as the fish jumped once and shredded my 4-pound test leader. I was totally distraught, but my pursuit and love of fly fishing for Steelhead was christened that day. 

Larry’s experience took place on Deep Creek at his father’s house further upstream. His dad outfitted him with an old 8-foot vintage South Bend bamboo fly rod, a worn out South Bend casting reel and a tattered spinning fly. After a few words about safety from his dad, he headed downstream and began to fish. Incredibly, after only a few haphazard casts a 6-pound Steelhead grabbed his spinning fly and tore down river with Larry screaming wildly. His dad heard him yelling and fearing the worst he charged down to help his son. Unfortunately, after several minutes of intense instruction, the fish broke the line. To this day, Larry is still a dedicated fly fisher and has mastered the art; however, he still laments the day he lost his first Steelhead. 

We have since discussed the unlikely odds of two beginners fly fishing the same stream years apart and hooking and losing their very first 6-pound Steelhead. It’s amazing how agonizing defeats can leave such lasting impressions. 

Saturday, May 9, 2015

The Kalama Special Steelhead Fly

Kalama Special Steelhead Fly
Mooch Abrams of Portland, Oregon, developed the Kalama Special in the 1930s to fish for Sea-Run Cutthroat. It was later popularized by Mike Kennedy to fish for Summer-Run Steelhead on Washington’s Kalama River. Mike used the fly so often that it was sometimes called the Kennedy Special, however; Mike never claimed it as his own. The fly is used effectively on many other rivers, especially in the late summer when grasshoppers are available. A few of his many steelhead patterns are the Fool’s Gold, the Maverick and the Dingbat. 

Materials for tying the Kalama Special:
Hook:  36890 Mustad, sizes 4 to 6
Thread:  3/0 black monocord
Tail:  Red hackle
Body:  Yellow yarn or chenille
Hackle:  Badger
Wing:  White calftail or bucktail

Step 1.
 Attach the red tail, hackle and body material. 

Step 2
Wrap the body forward and follow with five to six turns of hackle. 
Be sure to leave room to tie off the head. 

Step 3
Pull the front end of the hackle back and slightly wrap back over it to form a 
slight backward angle. Finish by tying in the wing and cementing the head.

Thursday, May 7, 2015

Fly Fishing with Split-Wing Flies

Juicy Bug
The Juicy Bug was created in the late 19th century 
by Russ Towers of the Empire City (now known as 
Coos Bay) and his fishing partner Ben Chandler. 
   
The original split-wing steelhead flies were developed on the Rogue River in Oregon to fish for steelhead and salmon in the early 1950's. They were tied on small hooks--Nos. 8 to 10--with the wing pointed toward the rear of the fly. The flies produced a lot of action as they skittered, twitched or waked across the surface. Double hooks were commonly used with the belief that they were needed to land a large fish. Today, however, larger single hooks--Nos. 6 and 4--are primarily used. 


October Caddis    
The October Caddis was devloped by Bill Bakke,
a conservation director of Oregon Trout and avid fly fisher. 

The wings of waking or skating patterns are pointed forward and can entice fish to come to the surface. Strikes are usually very aggressive. As the fly swings across the surface, it creates a noticeable disturbance that alerts fish to a possible source of food. This is called the "wet fly swing" or the "grease line method." This method was developed in Europe years ago and refers to greasing or waterproofing silk fly lines to help them float.  

The "broadside method" is eerily exciting. The fly is presented in the same manner as the split wing and waking patterns, but a curve in the fly line is allowed to occur. As the fly swings, a noticeable wake follows the fly which alerts holding fish. However, instead of the explosive strikes that the other methods produce, steelhead simply suck the fly in like it is taking a dry fly. 

I can remember using these methods and steelhead would chase my split-wing fly 7 to 8 times across the surface without hooking up. The excitement of a steelhead repeatedly boiling in an attempt to take your offering can really tense your muscles. Don’t worry about it! Just bow to the fish, set the hook and enjoy the action. 

Materials for tying the Juicy Bug:
Hook:  Mustad 3582, size 4-6  
Thread:  black 3/0
Tail:  Red hackle fibers
Body:  Black and red chenille
Ribbing:  Silver oval tinsel
Wing:  White calftail

Materials for tying the October Caddis:
Hook:  Mustad 36890, size 2-6   
Thread:  Black 3/0  
Tail:  Deer hair  
Body:  Orange yarn 
Hackle:  Brown         
Wing:  Deer hair                   

Saturday, May 2, 2015

The Thunder and Lightning Fly is more than a Great Storm Fly

Doug's Version of the Thunder and Lightning Fly
The Thunder and Lightning fly was supposedly named after a sudden storm caused a river to rise quickly and which in turn caused salmon to go into a feeding frenzy. However, as years passed, fly fishers discovered that it was a much better fly in low water. Because of this, I tend to believe that the Thunder and Lightening fly is an all-around pattern that can be used in many conditions. There are numerous variations that are effective as well. 

My only experience with this fly occurred at Davis Lake, Oregon where rainbows of ten pounds or more could be caught. My friend Bill and I had been fishing this lake for several hours with only a few smaller fish to our credit. We were still enjoying the day, when the weather suddenly began to turn for the worse. Dark, ominous clouds began to build up in the northeast which quickly grabbed my attention. When thunder began to rumble, I told Bill that we should head back, but he just scoffed and said with a cocky sneer, “What, are you afraid of a little lightening? 

I glared directly at him and said, “Bill, we are sitting in an aluminum boat and our graphite fly rods are lightning rods! Let’s go before it gets worse.” 

He was very indignant and said sarcastically, “Maybe we’ll have better luck if we use the Thunder and Lightning fly!” 

When he laughed, I glared at him and yelled, “Bill, that’s taunting nature! I’m rowing back and taking cover.” 

The minute we got to camp, thunder, strong winds and lightening began to threaten us. Besides the lightening, the rain began to pelt the camp, the wind collapsed our tent and our sleeping bags got sopping wet.  After we weathered the storm, the subject of lightening never entered our conversation again.

Dr. T. E. Pryce-Tannant refers to the Thunder and Lightning fly in this book, How to Dress Salmon FliesThe original recipe for this fly took 16 applications, but here is a simplified version that should also work.

Tag:  Oval gold tinsel
Tail:  Golden pheasant crest
Butt:  Black ostrich herl
Body:  Black floss, gold tinsel and palmered orange hackle
Throat:  Blue jay feathers
Wing:  Bronze mallard feather over teal
Topping: Golden pheasant crest
Shoulder:  Jungle Cock
Head:  Black ostrich herl

Wednesday, April 29, 2015

The Highly Acclaimed Black Ghost Streamer Fly

Black Ghost fly tied by Doug Stewart
In the late 1920’s, streamer fly fishing in America had its early beginnings in the state of Maine. Local fly tiers began to develop bait fish patterns to fish for trout and landlocked salmon in lakes. Initially, their patterns were not fancy, but as time passed, more elaborate flies began to appear. One of the first and most basic renditions was the Black Ghost, developed by Herbert Welch in 1927. This feather wing fly is most effective on darker days or when the water is off color. 

Streamers have been noted for catching larger fish by using a variety of strips and pulls. Erratic strips can indicate an injured fish and will also produce aggressive takes. This method can be used effectively in tailwater fisheries as many small fish can become disorientated, stunned or killed below the spillway. A popular lake method is trolling the fly. 

Materials:
Hook:  No. 36890 Mustad, sizes 6-2
Thread:  3/0 black
Tail:  Yellow hackle fibers
Body:  Black floss and medium flat silver tinsel
Throat:  Yellow hackle
Wing:  2 white saddle feathers, tied streamer style
Cheeks:  Jungle Cock nails or substitutes


Step 1. Tie in the tail and attach the floss and tinsel. 

Step 2. Wrap the floss up to 3/16 inch from the eye. 
Follow with 6 to eight turns of tinsel and tie off. 

Step 3. Tie in the throat and prepare the feather wings for application. 

Step 4. Tie in the wings not to exceed 3/4 inches behind the hook. 
Tie in the Jungle Cock nails on each side of the hook and complete the head.


Please read our terms of use policy